Nothing like it
I never liked sausage all that much. I didn’t care for hot dogs. I didn’t eat kielbasi. I hated brats. In fact, I remember the first time someone offered me a brat. I was at a barbecue and brats were the only thing on the grill. I remember they looked good. They smelled good. So I plopped one onto a bun, squeezed on some spicy mustard, took a bite…and tried my hardest not to spit it back out. It was terrible. I don’t know if it was the grill master or the brat itself, but I swore them off for a couple years, categorizing them with all the other sausage products I didn’t eat.
Of course, my tastes have expanded now. Kielbasi? Yes please! Italian sausages? I’ll have seconds! Brats, you say? Bring them to mama! Since that terrible brat moment, I’ve since learned that brats are my friend. Especially the beer brats. Mmm mmm mmm! Seriously, I could eat a whole pack by myself. There’s no such thing as leftovers. So I only make them when I know I’ll be sharing. Otherwise I’d surely go into a brat coma and never recover…
My preferred method of cooking brats? Well, as you all know I am a devoted advocate of the broiler. It’s December. I am not standing outside by the grill (though recently you would think it was May rather than December the weather’s been so nice). Besides, broiling is a pretty quick cooking method and now that I’m working that 9-6 schedule, quick dinners are something to be desired. And for brats, all you need is a pan and the meat and your good to go!

Ingredients:
- 1 package beer brats (or any brat of your choosing. Or kielbasi. Or Italian sausage- the possibilities are endless)
This is so easy, I’m inclined to write it down in steps. A little change in pace if you will
Step 1– Preheat broiler. Mine is 500 degrees. Make sure your oven rack is about 7 inches below the broiler
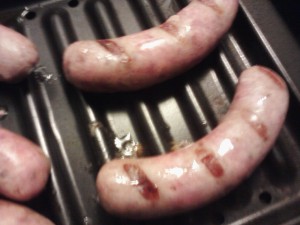
Step 2– Pull out your broiler pan and line it with your sausages. If you want those pretty grill marks, lay them horizontally so you can tell everyone they’re hot from the grill

Step 3– Place pan in oven. Cook for about 8 minutes. Throw some pierogies in the oven while you’re at it

Step 4– When your timer goes off, flip those brats! See? Grill marks! Mission accomplished
Step 5– Cook for another 8 minutes or so and Voila! All done. So go get your grub on. Wasn’t that easy? Dinner ready in under 20

I don’t know about you guys, but I would totally cook these up for a quick breakfast, too. It’s sausage, right? Enjoy!
Tijuana
Direct heat

I have an announcement to make! Today I entered to win a KitchenAid Stand Mixer…along with some 60,000+ other people. My odds are slim, but they’re better than not entering at all. My fingers are tightly crossed.
But that wasn’t my real announcement. What I really wanted to say is that the broiler and I are becoming fast friends. I have grown to love my broiler. She is teaching me wonders about cooking tender, juicy meat. First the steak and now the lovely pork chops I made for dinner tonight. I will never cook on the stove top again! Okay, that’s probably not true but I’m certainly feeling that way at the moment. And it’s so fast. Tonight my dinner was done under ten minutes (not including the time it took to marinate the chops). Aaaa-maaaaaazing! Let’s not forget that the cleanup is pretty easy, too. Oh, yeah!
It seems to me that recently I’ve been borrowing a lot of recipes, some of them tweaked, some of them not. Today was no exception. I knew I wanted to make some pork chops, but had no idea how to do them up. Pan fried, smothered, baked, grilled, Asian style, Italian style (which almost happened), Southwest style. The possibilities were endless and yet I could not settle on a single idea. SO I turned to the web. Smitten Kitchen to be precise. I stumbled upon a lovely haiku she had written about her pork chops and was inspired to write my own:
Tender, soft, juicy
Pork chop how I enjoy thee
Melt in your mouth glory
I can’t take all the credit. The boyfriend helped with those lines! He can be cute when he wants to be. Anyway, so the recipe I used belongs to Deb Perelman with slight changes. I jumped the gun and ended up throwing all my spices in with the oil at once, but it turned out superb. I was a little iffy about using cumin because it just isn’t one of my favorite spices, but the more bites I took, the more I loved it. Mmm hmm!
Recipe courtesy Deb Perelman

Ingredients:
- 3 in-bone pork chops
- 1 teaspoon oregano
- 1 teaspoon cumin
- 1 teaspoon salt
- 1 teaspoon pepper
- 1 tablespoon paprika
- 1 tablespoon garlic, minced
- 2 tablespoons olive oil
Heat olive oil in skillet with garlic on medium-low heat

In a small bowl, mix together your spices. Once you can smell the garlic (it only takes a couple minutes), mix the spices into the skillet with the oil


Stir together for about another minute

Make sure you cleaned your shops. Habit, what can I say. Then pour the sauce over them in a large bowl

Now get your hands dirty!

Allow your little chops to marinate for about 30 minutes. I think I shaved off a few minutes. A girl’s gotta eat! Preheat your broiler. Spray a broiler pan with (none other than) PAM. Arrange your pork chops onto the pan as best as you can

Alright, stick those babies under the broiler for about four minutes. Oh, and don’t forget to move your rack to the upper part of your oven. I put mine one above the middle slot. I feel like the top slop is just too close. Maybe one day. After your four minutes is up, flip

Stick them back under the broiler for another 4 minutes. Easy as pie, I tell ya! Be sure to let your beauties rest for a few minutes, enough time to whip up a side salad. Pick your favorite chop and dig in. Serve with your salad and some mashed potatoes

I’d say this is another meal to add to the I-want-to-impress-someone pile. So tender and juicy! Didn’t even need a knife. Slrrp! Finish it off with a slice of Farm Fresh tiramisu that you just know you could make better. Time to pull out the notebook

Tijuana
