Category Archive
The following is a list of all entries from the Meat category.
Almost like my Granny
I’ve been craving me some biscuits and gravy! Mmm there’s nothing like a plate of gravy to fill your soul with warmth…or remind you that times are low. Poor man’s food at it’s finest without breaking out the Ramen. Actually, gravy reminds me of my Granny. She made gravy and biscuits, gravy and toast- whatever was on hand- all the time growing up. I remember standing by the stove as a little girl as she showed me to make the stuff. Melt the butter. Add the flour. Stir the roux. Finally add the milk and season to taste. Since she’s a vegetarian she always made a simple white gravy and that’s how I’ve always preferred mine. But today I’m feeling a little adventurous. Sausage, anyone?

Aside from fond memories with my Granny (I really should go up for a visit!), biscuits and gravy is a cheap meal. I fed three people dinner and had some leftover for breakfast the next morning all for $4.65. Can’t beat that!
Ingredients:
- 1 lb breakfast sausage
- Butter/oil if needed
- 1/4 cup flour
- 3 cups milk
- Salt and pepper to taste
- Seasoned salt to taste
The first thing you need to do is brown your sausage. I personally prefer to do this in a pot, but you can use a deep skillet or I know lots of people that prefer to use a cast iron skillet. To each their own

Make sure to break it up!

Once your sausage is all browned up, you may need to add some extra fat. This sausage was pretty lean so I added about a tablespoon of oil. I prefer to use butter, but oil works just as well. Now that you have the needed fat, stir in the flour

If you like, you can remove the meat and make a roux, but I’m lazy and find adding the flour directly to the sausage to be more convenient. Make sure to stir the flour in really well.

Let it cook for a minute. This will make a nice thick gravy!

Add the milk. I only like to use 3 cups, but if you prefer a thinner gravy you can add more. Bring to a little boil, stirring constantly. If you don’t stir, it’ll stick to the bottom, the milk will scorch, and all that bad stuff. So keep stirring. Once you get that boil going, turn the heat down to low.

Season with salt and pepper. Go light on the salt because the sausage is usually pretty salty. If your tastes are anything like mine, go heavy on the pepper. I like my gravy nice and peppery. You can add some seasoned salt too (aka Red Robin Seasoning)

Taste as you go!

Allow to simmer until the gravy reaches your desired thickness, maybe 10 minutes. It’s usually done by the time the biscuits are ready. Don’t forget to put them in the oven!

Oh yes, this is what I’m talking about! Plate up and serve!

Not quite like Granny, but still pretty darn good!
Almost like my mama

What do you know? I’m back again already! That’s because I cook in phases. This has been a very good weekend for cooking. Unfortunately, I don’t have detailed pictures for this recipe, but that’s okay. I’ll probably revisit this again in the future.
Once I boasted that I my diet consists largely of chicken dishes and Italian food. With an Italian father who also happens to be a chef, that’s what we ate. That’s what I love. That’s some of my favorite comfort food. But Italian is not the only thing in the blood. I come from a Southern family. Fried chicken, cornbread, barbecue, and (my absolute favorite!) fried cauliflower are also classic comfort foods in my kitchen, especially if you serve it all with a heaping bowl of mac n cheese. However, with the holidays approaching and the weather crisping up, I’ve been feeling awfully Polish of late. That’s right. I got some of that going on as well.
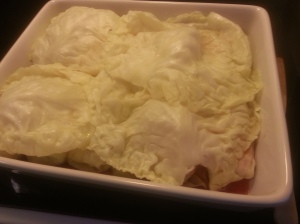
When I was dating the sous chef, I was pleasantly surprised to learn that his family serves pierogies with their holiday meals. And they are so good! Pierogies and kielbasa. I really hope to feast on them again this year, too. My family eats Gołąbki. For those of you that aren’t familiar with the term, golabki is also referred to as cabbage rolls or stuffed cabbage. Now this wasn’t a holiday meal for us as more of a I’m-in-a-golabki-mood kind of meal. I remember the first time my mom made it. I was not excited about the idea of having stuffed cabbage for dinner. Keep in mind I was a picky child. Thank goodness I grew out of that! But let me tell you, one bite and I was hooked. Tender cabbage, seasoned meat, homemade tomato sauce if you have the time and produce (my mama always bought it in a jar, but I’m a scratch kinda girl). Delicious!
This time I did not make my own tomato sauce, and this is not my mama’s recipe. I’ve made modifications of my own that seem to have worked out better than I expected.
Ingredients:
- 1 head of cabbage
- 1 onion
- 1 green bell pepper
- 1 lb ground beef
- Garlic
- Olive oil
- 1 cup or so of prepared quinoa (rice is used traditionally; be my guest)
- 1 egg
- Salt, pepper, and parsley
- 3/4 cabbage water
- 1/4 cup + another 1/2 cup tomato sauce plus more for serving
The first thing you need to do is set a large pot of water to boiling for your cabbage. While you wait for that to happen, remove the core of the cabbage. This has never been my forte, in fact I’ll admit that I sent the core shooting across the kitchen and knocked a glass off the counter. If you don’t know how to core a cabbage, I recommend YouTube. We are boiling/blanching our cabbage whole, so don’t go butchering the poor thing. I’m pretty sure my mom did not boil it whole but removed the leaves to boil. Don’t ask how she managed that. In my opinion, you get less tears if you boil the thing whole. Less work, too.
Once you’ve cored the cabbage and your water begins to boil, place the cabbage in the pot core side down and cover with a lid. If your pot isn’t large enough to really submerge the whole head, you can flip it over halfway through. Don’t forget to salt your water.
Meanwhile, shop your onion and bell pepper, and mince the garlic. Get out a saute pan and set it on medium, drizzle it with some oil, and let your veggies sizzle. Cook them down for about ten minutes until tender. Make sure to salt and pepper them to your liking. When they are done, set aside in a mixing bowl.
Check your cabbage. At this point it might be ready. Sometimes you just have to start removing some of the outer leaves and put the heart of the cabbage back to boil. I prefer doing this on a cookie sheet for easy clean up. Using one fork, spear your cabbage core. Use another fork to peel back as many of the tender outer leaves as you can and set them aside. Maybe you’ll gt lucky and the whole thing is tender, but I doubt it. Place the rest of the cabbage back into the pot and continue boiling.
Now, I really wish i had a picture for this part. If you’ve worked with cabbage before, you know that each leaf has a little rib in it. This makes for difficult rolling. Take a paring knife and peel off the thickest portion of the rib. You don’t want to cut all the way through the leaf. Just remove as much as the rib as you can while leaving your cabbage leaf in one piece. It’s not as hard as it sounds, though your cabbage may still be rather warm so don’t burn yourself with hot water that may be collected in the leaves. Once the cabbage is all set, we can work on the filling.
As I mentioned, traditionally rice is used for the filling. I decided to give quinoa a try because I’ve never really had it before and was told it’s a lovely rice substitute. The verdict is still out, but it still left me with a great dish. If you don’t want to use quinoa, stick with rice. White rice, brown rice, it’s up to you. I used to save those little cartons of rice that came with my Chinese food. Works great!
Anyway, take your mixing bowl with the onion mixture and add the meat, the egg, the quinoa, 1/2 cup of tomato sauce, and salt, pepper, and parsley to taste. Mix it all up with your hands. Really get in there! That’s it! Preheat your oven to 350 degrees and start rolling.
You may think the idea of assembling your cabbage rolls is hard work, but it’s not. I’ve been doing it since I was 11. You can too. Of course, there aren’t precise measurements here. You have to go a little on instinct. If you’re nervous about running out of filling, you can count up your leaves then roughly divide your filling within the bowl. I just separate it into quarters and go from there. If you run out of filling, that’s okay because we want to save a few of the cabbage leaves anyway for baking.
To roll your cabbage, take a leaf and place it in front of you so that it looks like a little cup. The thickest part of the rib should be facing you. Take a spoonful of filling and plop it onto the end of the leaf where that thick rib used to be. Roll the leaf over the filling once, keeping it tight. Once you get over that first roll, fold the sides in then continue rolling. Someone once told me it was similar to rolling an eggroll. I’ve never rolled an eggroll so I’ll have to take their word on that. If you don’t get how to do it, YouTube is your friend. There are plenty of videos on how to make golabki. Some of them are in Polish, but that doesn’t matter. Just watch the technique. I promise it’s easy. Of course, the bigger your leaf, the more filling you’re going to use. The smaller the leaf, the less filling. Just feel it out!
Line a baking dish with your rolls. Some people cook their golabki on the stove. I prefer baking. I only got 11 out of my cabbage, but I’ve been known to get as many as 16. It depends on the head. It’s only me, so I didn’t want to make all that many. However, these taste even better the next day so they make great leftovers. Yum!

Once you have all your rolls lined in the dish, take about 3/4 cup of your cabbage water and mix it with about 1/4 of a cup of your tomato sauce. My mom just doused the whole thing in tomato sauce. You can do that if you like. Next, cover the rolls with a few of the leftover cabbage leaves. Now cover the whole thing with foil and stick it in the oven.
Bake for an hour and 15 minutes. Then turn off the oven and leave it in for another 15 minutes. You basically just steamed your rolls, so wait a bit before you remove the foil and cabbage rolls, anywhere between another 15 minutes up to half an hour.

My preferred way of serving is with more tomato sauce. So heat some up and spread over your rolls. Maybe you have some pierogies on hand to serve with them as well.

Once upon a time

So I know a while ago I said I was back after realizing I could upload posts from my phone. If you haven’t already figured it out, I was not a fan of phone-blogging. Took too much time. But now I have my crappy laptop back for the time being so I might as well cook up a storm while it lasts. Don’t get too excited, though. I’m moving. Again. Because that’s what I do. So once again, I’ll try to cook more often while I can, but things won’t really pick up again until I get into my new place. Hopefully this one will last a little longer.
Anyway, for those of you that don’t know me too well, I am not a fan of pot roast. See, I’ve always been a chicken girl. Then I became a sometimes pork girl. Never have I considered myself a beef girl, though I do enjoy a well made steak. However, the other day I really wanted to sink my teeth into some meat. And when I think meat, I think cow. Chuck it up to the gloomy days we’ve been having, but I decided pot roast was going to be on the menu.
Only, I’d never made a pot roast before. Thanks to Google and several blogs, I came up with a semblance of a recipe to work with. It’s not perfect, and I’m sure once I really develop a taste for pot roast I’ll come up with something better, but it wasn’t as bad as I’ve always imagined. I’d really like to know when I developed such a negative idea about pot roast…
Since this was my first attempt, measurements weren’t really exact. I kinda just threw things into the pot!

Ingredients:
- 3 lb boneless chuck roast
- Salt and pepper
- Olive oil
- Carrots, chopped
- Celery, chopped
- Onion, chopped
- Garlic, minced
- 1 15oz can diced tomatoes
- Red wine
When I started my research, I noticed a trend. People like to sear their meat first. I’m not saying this is a necessary step. Please keep in mind I’m still not quite a pot roast enthusiast yet, but it seemed like a pretty good idea. So I pulled out my big pot, turned the heat on high, drizzled it with a bot of oil, and dropped my chuck in. Careful not to let it splatter. Don’t forget to salt and pepper it first. Liberally.

Notice the fat. I’m told fat is good for pot roast. Adds mm mm flavor. Make sure to sear all the sides until nice and golden. But we aren’t cooking the meat all the way. That’s not what searing means. We just want to brown the outside. Place on a plate when it’s ready and turn the heat down to medium. Hopefully your kitchen didn’t become as smokey as mine when you seared your roast. Bad ventilation…?

Now the aromatics! Add a splash more olive oil to the pot then take all those chopped veggies (plus the minced garlic) and toss them in. Oh, just smell it!

Cook them down for five minutes or so. Add the seared chuck back to the pot.

Tomato time! Pop the lid and pour them in.

Ah, next the wine. Red wine. Any red wine you like. I decided to try this one, but pick your favorite!

I’d go with about two cups. Or more. Just save yourself a glass. also, add some greenery. Rosemary and thyme please.

Bring to a boil then turn the heat way low. Cover and simmer. And simmer. And simmer. In fact, just forget about it for a good long time. Five hours, eight hours, overnight. Pretend it doesn’t exist. Only, that’s going to be pretty hard. I may not be a pot roast girl, but it sure does smell good. Does it get any better than this? I recommend leaving the house for a while. The temptation is too great!!!
After that good long while, you can check on your roast. Some people turn the heat back up at this point for another 30 minutes, flipping halfway through. I decided to give it a try. I’m not really sure this was a good idea uncovered, but went with it anyway.

All done! Plate ‘er up! I served mine with mashed taters. That recipe will come along eventually.

Not bad for my first time, but I didn’t cook mine as long as I would have liked. So make sure to forget about yours!
Nothing like it
I never liked sausage all that much. I didn’t care for hot dogs. I didn’t eat kielbasi. I hated brats. In fact, I remember the first time someone offered me a brat. I was at a barbecue and brats were the only thing on the grill. I remember they looked good. They smelled good. So I plopped one onto a bun, squeezed on some spicy mustard, took a bite…and tried my hardest not to spit it back out. It was terrible. I don’t know if it was the grill master or the brat itself, but I swore them off for a couple years, categorizing them with all the other sausage products I didn’t eat.
Of course, my tastes have expanded now. Kielbasi? Yes please! Italian sausages? I’ll have seconds! Brats, you say? Bring them to mama! Since that terrible brat moment, I’ve since learned that brats are my friend. Especially the beer brats. Mmm mmm mmm! Seriously, I could eat a whole pack by myself. There’s no such thing as leftovers. So I only make them when I know I’ll be sharing. Otherwise I’d surely go into a brat coma and never recover…
My preferred method of cooking brats? Well, as you all know I am a devoted advocate of the broiler. It’s December. I am not standing outside by the grill (though recently you would think it was May rather than December the weather’s been so nice). Besides, broiling is a pretty quick cooking method and now that I’m working that 9-6 schedule, quick dinners are something to be desired. And for brats, all you need is a pan and the meat and your good to go!

Ingredients:
- 1 package beer brats (or any brat of your choosing. Or kielbasi. Or Italian sausage- the possibilities are endless)
This is so easy, I’m inclined to write it down in steps. A little change in pace if you will
Step 1– Preheat broiler. Mine is 500 degrees. Make sure your oven rack is about 7 inches below the broiler
Step 2– Pull out your broiler pan and line it with your sausages. If you want those pretty grill marks, lay them horizontally so you can tell everyone they’re hot from the grill

Step 3– Place pan in oven. Cook for about 8 minutes. Throw some pierogies in the oven while you’re at it

Step 4– When your timer goes off, flip those brats! See? Grill marks! Mission accomplished

Step 5– Cook for another 8 minutes or so and Voila! All done. So go get your grub on. Wasn’t that easy? Dinner ready in under 20

I don’t know about you guys, but I would totally cook these up for a quick breakfast, too. It’s sausage, right? Enjoy!
Tijuana
I wasn’t permitted to read Dr. Seuss as a child
He brought everything back,
all the food for the feast.
And he, he himself, the Grinch,
carved the roast beast
Oh my goodness! Friday I decided to make dinner for the boyfriend. He’d just returned from a trip to Pennsylvania and I wanted to do something special. Plus a friend was coming over and I figured why not cook up dinner for everyone. But what to make? Well, not so long ago the boyfriend requested pot roast. I have issue with pot roast. It’s just not one of my favorite things to eat. I’m not saying I don’t like it exactly…there are just other forms of beef I’d rather indulge in. I’ve always had these feeling about pot roast. Give me a roast chicken any day! But I agreed to get around to it for him and Friday was just as good a day as any.
And I blew myself away! I’m not sure if what I made could be classified as pot roast or braised beef (aren’t they rather the same thing?), but I kept calling all kinds of names (roast beef, pot roast, the beast in my pot) so I suppose it doesn’t really matter. All I know is that it was pretty dang tasty and I shall definitely be filing it away for future use. The best part? The dish ended up making two meals! But I’ll get to that later.
Let’s talk about my method real quick. As mentioned, I’m not a fan of traditional pot roast so I decided to give it an Italian twist. Whenever in doubt, always employ Italian twists. In my opinion, it’s extremely hard to go wrong with Italian. Besides, the boyfriend’s Nana sent him back with all kinds of canned goodies-tomatoes, peppers, beets, peaches- and I decided the tomatoes and peppers would serve my purpose superbly. Dump everything into the dutch oven, add some good herbs, and let the whole thing go for a few hours! I love one pot meals.
Once again, sorry for no pictures. I’ll get around to replacing/upgrading my phone eventually. Then I’ll just have to remake all these delicious dishes again for you. Sounds like a deal to me!
Ingredients:
- 3-4 lbs chuck roast (I used boneless but by all means keep the bone!)
- 2 jars canned tomatoes (or get a couple cans of crushed tomatoes)
- 1 jar canned/pickled peppers (I’d bet money that a jar of pepperoncinis or roasted red peppers would work)
- 2 cups chicken stock (feel free to use beef stock. I don’t like strong beef flavors)
- 1 can spaghetti/marinara sauce (for added depth)
- 2 tablespoons garlic, minced (because everyone is getting sick- no thank you!)
- Basil
- Oregano
- Parsley
- Crushed red pepper flakes
- Salt
- Pepper
- Sugar
- Olive oil
Okay, let’s get to it! The first thing we want to do is sear our meat. Heat a tablespoon or so of olive oil in a dutch oven on high heat. Medium-high if you hate how the oil tries to jump up on you from the pan. Quickly season your meat generously with salt and pepper. Once the oil is hot, using tongs place the chuck into the pan. Sear all sides until brown then remove from pan and set aside. Turn heat down to medium-low.
Now, my pantry is a little empty right now so I didn’t include extra vegetables, but if you have onions and carrots on hand then add them in! Chop those babies up and toss them into the remaining oil and let them cook down a little bit. But if you’ve neglected to go grocery shopping skip all that and use about half the chicken stock to deglaze the yummy bits left from the chuck in the bottom of your dutch oven. I also added my garlic in during this step and let it simmer in the liquid. After a few minutes, add the remaining stock. Once again, feel free to use beef stock if you prefer or even water with bouillon cubes.
Everything is downhill from here. Empty both jars of tomatoes into your pot. Dump in the peppers. I added all the peppers, but only half the juice. If I were using pepperoncinis or roasted red peppers, I’d use all the tasty liquid to my advantage. Next, pop open your can of tomato sauce and add that in too.
My jars of canned tomatoes were just plain old tomatoes, so I spiced things up a bit with the oregano, basil, and parsley. You can do this to taste. I probably used between 1/2 a tablespoon to a whole tablespoon of herbs. Sprinkle in some sugar, as well. To counteract all the acid. Also, I like things hot so I added copious amounts of crushed red pepper flakes.
Is that everything? Place the chuck roast smack dab in the middle of all the red goodness and bring to a quick boil. Turn the heat down to low, top the pot with a lid, and leave it alone for 3-4 hours depending on your patience. The longer it cooks, the more tender the meat will be. I took mine out after only 3 hours, but we were all starving and I started cooking later then I had intended. But you’ll be on top of your game, I’m sure.
After the prescribed time, you have two choices. You can either shred your meat and serve it in the red soup that has been created inside your dutch oven. Or you can remove the meat, slice it, and serve it on a platter. I chose the latter route. Mmm mmm mmm. So yummy for something so usually not yummy. Everyone loved it, myself included. I served it with garlic mashed potatoes and Italian sauteed green beans. It was a wonderful meal.
You wanna know what else was great about my roasted beast? All those tomatoes and peppers and chicken stocked turned themselves into a lovely, spicy soup that I saved and served for dinner the next night. Can I get a big CHA-CHING?!
Two meals in one!!! Hope you enjoy it as much as we did
Tijuana
Something like magic
Today I woke up with a mighty craving. A strange craving, but a mighty one. First thing this morning, I was in the mood for something sloppy. You got it, I wanted a Sloppy Joe. Where did this need come from, I couldn’t tell you, but I’ve been thinking about one of those things all day long. I find it strange because I haven’t eaten one in probably a good seven years. Go figure.
But the Joe was a dear childhood favorite. I blame Mary-Kate and Ashley Olsen. It all started with a scene from the movie It Takes Two. Anyone remember that movie? I’ll admit back in my tween years (or I suppose just before hitting the tween years), I was an Olsen fan. This one was one of my favorites and I remember watching it all the time. The most vivid scene I remember is one of the twins (I think it was Ashley) not wanting to eat the Sloppy Joes and then naturally falling in the love with. Just look at that face!

Classic! Just classic! Kids, always try something new. You never know when you’re mind will be blown away. Ever since that day, I’ve had this ideal of what a Sloppy Joe should be and could never find it. Manwich never really did it for me, which is probably why i haven’t eaten one in so long. But today is different. Today I will create my perfect Joe and it’s going to be amazing. Just ask Alyssa (Ashley). I think a monster was awakened that day.

Here’s to being a 90s kid! And to being a Pioneer Woman because I adapted this recipe from hers

Ingredients:
- 1 1/2 lb ground beef
- 1/2 an onion, diced
- 1 green pepper, diced
- 2 tablespoons garlic, minced
- 1 cup chicken broth
- 1 cup ketchup
- 2 tablespoons brown sugar
- 2 teaspoons chili powder
- 1 teaspoon dry mustard
- 1/2 teaspoon crush red pepper flakes
- 2 tablespoons Worcestershire
- 2 tablespoons tomato paste
- 2 tablespoons hot sauce
- Salt
- Pepper
Brown your beef. I like to use a large pot that way we can keep this as a one pot meal

In the meantime, dice your onion and green pepper

As you can see, my garden did yield that much green pepper. Make sure you find a nice big one. Makes all the difference in flavor! As this time, go ahead and mix together all your spices. You could just dump them in the pot later, but I had some time to kill

Once your beef is nice and browned, drain it and return to pot. Add in the onion, garlic, and green pepper

Wait for the onions to get translucent and squirt in the ketchup. I know. Sounds weird. Smells weird, too. But it will turn out. No fear

Stir it all together then throw in those spices you mixed up earlier. Don’t forget to salt and pepper to taste. I recommend keeping the heat on medium

The pioneer woman adds water to her Joes. I decided to get fancy and used chicken broth instead

Ah, it’s coming together now! Go ahead and add the Worcesterrrwoosectershirechur- that sauce that no one can pronounce!

Some tomato sauce emboldens the flavor

Let’s not forget the hot sauce. Sorry, dad. You were right. I did make it a touch spicy…

That’s okay. Spicy food keeps the doctor away! It’s almost time to eat. Let simmer for 15 minutes. The sauce will get nice and thick and before you know it you have good ol’ Sloppy Joes. If you’re anything like me, wear a bib and leave the whites in your closet

Serve with a slice of cheese and some fries and go watch the Redskins dominate in preseason!

I think from now on I’m going to serve these guys in a sub roll or hot dog buns. You know, to minimize the mess just a teensy bit
Tijuana
Cheater cheater pumpkin eater
So Saturday the boys and I had a steak-off! That’s right, I was the only participating female. Kinda makes you realize how often your time is spent in the company of gentlemen. Guess that happens when all your friends start to leave and get married and begin their lives. Sigh…looks like I’m falling behind in that department. I always was the late bloomer.
Anyway, enough of that gloom because I have reason to celebrate. Back to the steak-off! I feel like we’d been planning this steak-off for weeks and something always seemed to get in the way. But not Saturday. The three of us- Bobby, Frank, and I- were determined. And by golly, we made it happen!
Originally, I was going to come up with a new marinade. But the boyfriend told me to use the one here. I obliged. It’s a good marinade. Full of flavor with a hint of heat…which could be a downfall if your judges don’t like heat. To each their own (cough cough bunch of babies- just kidding!)

Now, a certain someone didn’t feel like pulling out the charcoal grill so Bobby and I had to turn to my trusted broiler

Bobby went and got fancy on us with a nice Porterhouse. Man, I wish I had gotten one of those! It was so much juicier than my puny little steaks

I was aiming for medium, but I think I ended up with medium-well. I think my thermometer is on the off side

Then these guys showed up (late) with a grill. If only I had known!

That’s okay. His steak might have had that char-grilled taste, but he and Frank are cheaters. Take a look at this:

Store bought marinade! Oh, the shame of it. Actually, I didn’t mind all that much. In my opinion, it gave Bobby and I the advantage. Not too shabby for oven cooked steak

And here is the lineup of judges

So who won you ask? ME! Yay, I beat out all the guys!
Tijuana: III
Bobby: II
Chris/Frank: I
Frank/Chris: 0
Chris and Frank brought two steaks. I don’t know which belonged to whom. It doesn’t matter. Homemade marinades rule! Next time I think we should all buy the same cut of meat. It really does affect things.
Direct heat

I have an announcement to make! Today I entered to win a KitchenAid Stand Mixer…along with some 60,000+ other people. My odds are slim, but they’re better than not entering at all. My fingers are tightly crossed.
But that wasn’t my real announcement. What I really wanted to say is that the broiler and I are becoming fast friends. I have grown to love my broiler. She is teaching me wonders about cooking tender, juicy meat. First the steak and now the lovely pork chops I made for dinner tonight. I will never cook on the stove top again! Okay, that’s probably not true but I’m certainly feeling that way at the moment. And it’s so fast. Tonight my dinner was done under ten minutes (not including the time it took to marinate the chops). Aaaa-maaaaaazing! Let’s not forget that the cleanup is pretty easy, too. Oh, yeah!
It seems to me that recently I’ve been borrowing a lot of recipes, some of them tweaked, some of them not. Today was no exception. I knew I wanted to make some pork chops, but had no idea how to do them up. Pan fried, smothered, baked, grilled, Asian style, Italian style (which almost happened), Southwest style. The possibilities were endless and yet I could not settle on a single idea. SO I turned to the web. Smitten Kitchen to be precise. I stumbled upon a lovely haiku she had written about her pork chops and was inspired to write my own:
Tender, soft, juicy
Pork chop how I enjoy thee
Melt in your mouth glory
I can’t take all the credit. The boyfriend helped with those lines! He can be cute when he wants to be. Anyway, so the recipe I used belongs to Deb Perelman with slight changes. I jumped the gun and ended up throwing all my spices in with the oil at once, but it turned out superb. I was a little iffy about using cumin because it just isn’t one of my favorite spices, but the more bites I took, the more I loved it. Mmm hmm!
Recipe courtesy Deb Perelman

Ingredients:
- 3 in-bone pork chops
- 1 teaspoon oregano
- 1 teaspoon cumin
- 1 teaspoon salt
- 1 teaspoon pepper
- 1 tablespoon paprika
- 1 tablespoon garlic, minced
- 2 tablespoons olive oil
Heat olive oil in skillet with garlic on medium-low heat

In a small bowl, mix together your spices. Once you can smell the garlic (it only takes a couple minutes), mix the spices into the skillet with the oil


Stir together for about another minute

Make sure you cleaned your shops. Habit, what can I say. Then pour the sauce over them in a large bowl

Now get your hands dirty!

Allow your little chops to marinate for about 30 minutes. I think I shaved off a few minutes. A girl’s gotta eat! Preheat your broiler. Spray a broiler pan with (none other than) PAM. Arrange your pork chops onto the pan as best as you can

Alright, stick those babies under the broiler for about four minutes. Oh, and don’t forget to move your rack to the upper part of your oven. I put mine one above the middle slot. I feel like the top slop is just too close. Maybe one day. After your four minutes is up, flip

Stick them back under the broiler for another 4 minutes. Easy as pie, I tell ya! Be sure to let your beauties rest for a few minutes, enough time to whip up a side salad. Pick your favorite chop and dig in. Serve with your salad and some mashed potatoes

I’d say this is another meal to add to the I-want-to-impress-someone pile. So tender and juicy! Didn’t even need a knife. Slrrp! Finish it off with a slice of Farm Fresh tiramisu that you just know you could make better. Time to pull out the notebook

Tijuana
Seeing pink
WINNER WINNER CHICKEN DINNER

Actually, it was a steak dinner. A very delicious steak dinner if I do say so myself. It was juicy and meltinyourmouth tender. Never have I experienced a steak like this before. I don’t know if it was the marinade I used or the cooking method, but a sun is on the horizon. I’ve always been a white meat kind of girl, whether that be pork or chicken, but I think steak might start appearing on the menu a little more often. Who ever would’ve thunk I could be converted!
So, let’s start from the beginning. Almost a year ago to the date, the boyfriend’s grandparents send him some steaks in the mail. Some Omaha steaks. Ooooh, yeah (said in a deep deep voice- draw it out!). Even I was excited, and I don’t eat a lot of red meat. Plus, the steaks came with a wok (though I’m not really sure why…), which I thought was pretty cool at the time- by the way, I’m in the market for a new wok. But all that is beside the point. My point is, those babies have been sitting in our freezer a few days shy of a year now. Sure, we cooked a couple when we first got them. Who lets steak go for that long (cough cough- us apparently)? Well, we still had two left so I pulled them out and set them in the fridge to thaw. Then today, I put them on the counter to warm up a little bit. Truth be told, I didn’t mean to leave them on the counter. I just got preoccupied. But we can say it was our intention!
Alright, now I had these steaks to cook and no idea how to do it. The weather outside was hotter than Florida and there was no way in hellfire that I was going to fire up our little grill. Nooooo noooo. I’d probably end up cooking myself, considering my cool temperature preference. Send me out in snow, not blazing heat. I supposed I could have done it on the stove top, but every time I tried to picture that, I imagined grease popping everywhere and the steaks burnin’ to a crisp. Some cooking methods I just don’t have down yet and simply cooking meat in a pan on the stove top is one of them. That left the oven. But I’m pretty sure we cooked them in the oven last time and I can’t remember a thing about them. Obviously, it wasn’t a meal to remembered. I was determined to do better this time.
After a little research, I discovered two genius things. The first, was a recipe for Korean Barbecued Flank Steak by Rachael Ray. We had beef tenderloins, not flank, but the marinade sounded too good to pass up. And I had a bag of stir fry veggies in the freezer. Sounded good to me. The second thing I discovered was a site called The Kitchn with an article on how to broil steak. Find it here I never thought about broiling steak before, but Lord was it good! It was like cutting into butter. And the flavor! I don’t use a lot of Rachael’s recipes, but this one is for keeps. For sure. I think the boyfriend may have made some threats about me not writing it down. Yes, it’s that serious.

Anyway, enough blabbering from me. Try it yourself. This steak will speak to your soul (which is obvious by the length of this post!)
Recipe courtesy Rachael Ray

Ingredients:
2 tbs grill seasoning ( I used Szeged steak rub)
1/4 soy sauce
1 tbs honey
1 tsp red hot pepper flakes
1 tbs garlic, minced
2 tsp sesame oil
2 beef tenderloins (or any cut of your choice)
Okay folks, this recipe is SUPER easy. That’s mostly because the marinade is doing all the work for you. And then the broiler will finish the rest. All you have to do is listen for the timer! To make the marinade, whisk together the grill seasoning and pepper flakes into a medium bowl. Add the honey and oil

Whisk in the soy sauce and garlic and that’s all she wrote! Did I say easy, or did I say easy?

The aroma alone is enough to set your tail wagging. Or I suppose your booty shaking?

Such bad lighting! That’s okay. No biggie. Now, here are those tenderloins I was talking about. They sure do look awfully dark. Hopefully we won’t die from eating them. They have been in the freezer, after all

I’m inclined to rinse my meat so that’s exactly what I did. Then I submerged them in that bowl of marinade and left them on the counter to become the lovely things that they became. This took maybe 10-15 minutes. However long it took me to decide to boil some water for some noodles. We were serving stir fry on the side, remember?

If you want to make stir fry, too, all I did was boiled up some egg noodles and cooked up my frozen veggies. I didn’t make my own stir fry sauce. I felt the marinade for the steak was sufficient enough. I was lazy. It happens more frequently then you know

Spicy spicy! Mix it all together (pictured somewhere above)

I don’t know when I became such a hardcore carnivore. As a child, I followed my mother and my grandmother’s suit and always ordered my burgers/steak/what-have-you well well done. No pink please. Now I like the pink. Medium-rare is just fine for me, which means the steaks will take no time under the broiler. Ten minutes tops. But if you want yours blood-free, add a few extra minutes on there. To each their own! So, turn on your broiler! I actually had a broiling pan. You’re gonna want to spray it down with PAM. Or you could rub it with some olive oil

For medium rare, broil on the first side for 5 minutes. Oh yeah, make sure your oven rack is relatively close to your broiler. I heard it recommended about 4 inches. Mine was probably around 6 inches away from the ceiling of my oven

Then flip! Cook for another 5 minutes. Remove from oven and let rest. If you’re really concerned that it’s not cooked to your liking, I suppose it’s okay to make a little cut to see. A little released juice won’t kill us

Oooh nellie, does that look good. Just look at it! Look at those juices!

Ah, perfection on a fork. I’m still in shock! Hope you were as impressed as I was. This steak right here is marriage worthy, I tell ya!
Tijuana
Worries lead to worts, wrinkles, and grey hair

Sometimes life hits you full force and your reaction is too slow to do anything about it. It’s like that black cloud you keep getting rid of finds a way back and you have to keep pulling out your umbrella. You’re always having one of those days, or one of those months, or heck even one of those years. Maybe your car puttered out or you lost your job or a loved one skipped town without a moments notice. Or maybe you just struggle with your bills. Seemingly worse, someone dear to you can’t stay out of trouble and you feel helpless as what to do for them. Perhaps you’re powerless to do anything at all except wait to hear the judgement.
On those dark days, we all deserve a little comfort. We deserve to feel love and warmth to give us hope that things will turn out better than we ever could’ve thought. When I’m feeling low and am seeking comfort, I head into the kitchen (after finding a big hug of course). It’s not that I have a need to eat, and honestly I’d rather cook for others than for myself. I go to the kitchen because it’s my favorite room in the house. If I could put a recliner or couch in there I surely would. Aside from writing my feelings and thoughts down, cooking is my most therapeutic habit. There’s something extremely calming about pulling ingredients from the cupboards and following a recipe. It’s the act of creation, I suppose, that eases the mind and settles the soul. Like any physical act, cooking gives you a sense of purpose for the moment.
When I want to make comfort food, pasta usually comes to mind. I grew up with an Italian-American father and our meals were thus heavily influenced by his Sicilian heritage (though probably not as influenced as my childhood memories would have me recall). On my mother’s side of the family, pasta was an easy go to meal when people unexpectedly showed up. Spaghetti was common fare. So sometimes, that’s what I think of when I want to indulge in some comfort food- and don’t feel like making lasagna. So that’s what I made last night for dinner after receiving some disheartening news.
If you haven’t guessed by now, it’s safe to say I like things hot! You’d think I was making arrabiata instead of spaghetti and meatballs. I’ve said it once and I’ll say it again; season things to your own taste. If you don’t like an extra extra kick in your sauce, by all means only add a tinsy winsy bit of crushed red pepper. I’m pretty sure I added more this round then I meant to anyway, but I still loved it (I feel for the poor boyfriend though. I’m always adding hot stuff into our food it seems!) Also, there’s only two of us so I didn’t make all that much sauce. Waste not, want not! You can double, triple, quadruple the recipe if you like. Add some wine, too, if you feel like it!

Ingredients:
The Balls
- 1 lb ground beef (or meat of your choice)
- 1/3 cup bread crumbs (I used an Italian blend but unseasoned is okay)
- 1 egg
- 1/2 cup shredded Parmesan (grated is fine)
- Splash of milk or water
- 1 tbs garlic
- Pinch of salt
- Pinch of pepper
- Small handful fresh basil, chopped
The Sauce
- 1 onion, diced
- 1 tbs garlic (plus some extra if it suites your fancy)
- 1 large can crush tomatoes
- Pinch salt
- Pinch pepper
- Pinch sugar
- Pinch crushed red pepper flakes
- Handful fresh basil, chopped
Since basil is the only thing that seems to be growing in my garden, that’s the herb with which I used to make my sauce. But you can use any Italian herb to your liking- parsley, oregano, mixed blend. Plus, I just really love basil.
First, we need to make our meatballs. Take all those ingredients in the first list and plop them into a medium bowl

I almost forgot the cheese. Wouldn’t that have led to some sad meatballs!

Mix mix mix! Don’t be afraid to get your hands dirty. This is the fun part! Ah, if only dough were as easy to work with as ground meat…

If you possess a melon baller (unlike me), this would be the time to break it in. A mini scooper of any kind would work as well. Just dig in and make some balls! But some of us have to do it the old fashioned way. Pinch off some meat and roll in between your hands until it forms into a little ball

Keep your meatballs uniform in size so they’ll cook up evenly. I like mini balls, but make them whatever size drives your tractor. You’ll need to stick them in the freezer for about 10 minutes to firm up. Or you can just go ahead and cook them. However, I like the freezer step. In the meantime, chop your onion and mince your garlic if you’re using fresh garlic

Back to the balls! In a heavy (deep) pan, cover the bottom with olive oil and fry your meatballs. We aren’t cooking them all the way through. Just giving them a nice sear is all

I developed a lovely method of swirling the hot oil and balls around in the pan. DANGER: don’t try this at home (or attempt at own risk)

Once the meat is browned (but not cooked), set aside on a paper towel

On to the sauce! Now, I’m not much of a beef fan so I drained the excess grease from my pot (though I didn’t wipe it clean) and drizzled in some olive oil. But by all means, use the beef drippings if you like! Dump your onions and garlic into the pan and cook until translucent

Everything’s downhill from here! Stir in your can of crushed tomatoes

Add sugar, salt, and pepper. The sugar combats the acidity in los tomates

Now add the basil. Add more than this. We LOVE basil. My garden is just a little low on fresh leaves at the moment. I really should get some more plants planted…

Finally, it’s time to add the meatballs back in. Turn heat down from medium to low and simmer for half an hour until the meat if fully cooked. While that bit of magic is happening, don’t forget to cook your spaghetti noodles in slightly salted water. My dad adds a splash of oil to his boiling water and so do I!

Oh yeah, don’t forget to add your crushed red pepper flakes either. You can do that when you add the salt, pepper, and sugar. Or when you add the basil. You could do it when you add the meat, but it’s easier to sir around if you do it beforehand

Buon Appetito! Load a bowl up and sprinkle with some of that shredded parm. If you think it’s too spicy, pour yourself a nice glass of milk. Or think fondly of your late Italian-American grandmother and make yourself an espresso.

Here’s too comfort food and cooking your worries way! Mangia!
P.S. I bet these would make for great meatball subs. Mmm
Tijuana
