Category Archive
The following is a list of all entries from the Dessert category.
Mistletoe
It’s Christmas Eve! I can hardly believe it. I don’t know what it is about this year, but it does n’t really feel all that much like Christmas to me. Perhaps it’s the crazy Virginia weather we have. 70 degrees one day, 35 the next. It’ll throw a person for a loop! Oh, but wouldn’t it be nice if we could get a little snow? For the most part, it snows once or twice a year around these parts. Sure, it melts almost as soon as it comes, but even one day of a winter wonderland is a magical, wondrous thing. Last year the magic didn’t come. I think we had an hour tops of flurries and not a spec of it showed up on the ground. I suppose I better stick some mittens under my pillow to invoke some winter chill. I remember doing that as a little girl. I don’t recall who taught this ritual to me, but every year I would pull out my mittens or even some gloves if mittens couldn’t be found and I would whisper some Christmas prayer in hopes to wake up the next morning to a frosted window. Believe it or not, it worked…though that’s likely due to the fact I usually did it on nights that were already calling for snow. Magic or no, it’s a tradition I always enjoyed. Like the elves knocking on our door every Christmas Eve and leaving pajamas. I still can’t figure out how those “elves” managed to ring the door bell every year without getting caught. Oh, the joys of Christmas.
But this year I don’t quite have the Spirit that I usually do. I just chuck it up to all the recent changes in my life. There’s just too much stimulation to sit down and really enjoy the nog, which goes completely against my last post about Indian Time. Plus, all my friends are spread out across the continents this year and things are just not the same. But that’s okay. I’ll still relish a feast of beasts tonight along with a little Christmas mass. And let’s not forget the presents either! We finally finished up the last of our presents last night and I’m rather satisfied with everything. Now I just need to get some boxes to start shipping a few things out to those too far away to visit (sorry guys…you won’t be getting anything until after the holidays).

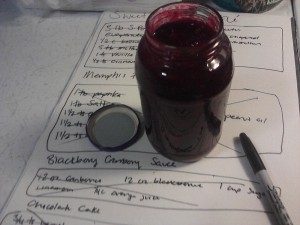
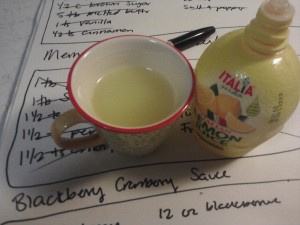
Christmas aside, I did promise to finish up my Thanksgiving posts and true to nature I’m cutting it right down to the wire. But my first recipe is for a lovely blackberry-cranberry sauce that would be just perfect for Christmas dinner. See, I’m not late. I’m just making the recipe better accessible for holiday chefs.
Now I’ll admit that this recipe is not completely my own. It’s a hodge podge of at least three different ones I found while browsing the web. Here are the links in case you’re interested to draw some inspiration of your own:
Spinach Tiger’s Cranberry Blackberry Sauce and Syrup
Joy of Baking Cran Raspberry Sauce
Fake Food Free Blackberry Cranberry Sauce with Cinnamon
Ingredients:
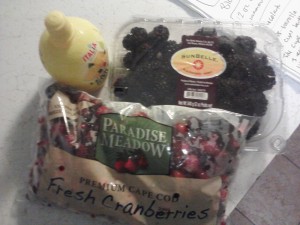
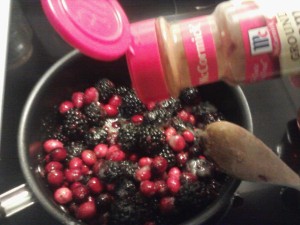
- 12 ounces fresh cranberries
- 1 package fresh blackberries (I used the large pack)
- 1/2 cup sugar
- 1/2 lemon juice
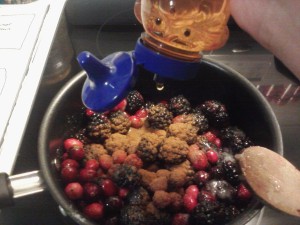
- Honey
- Cinnamon
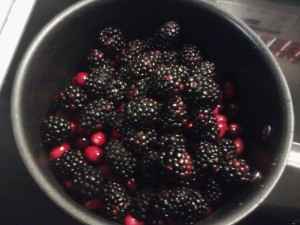
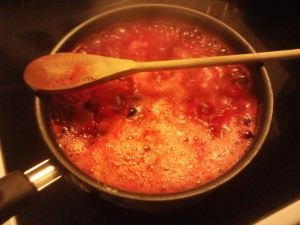
I promise is super easy, much easier than the last recipe I posted. The first thing you want to do is rinse off your cranberries and blackberries, then dump them into a decent size pot/sauce pan. We’re making sauce after all!
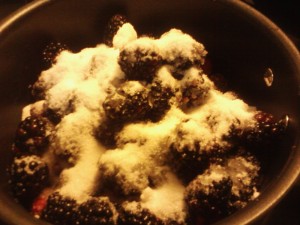
Add a 1/2 cup of sugar…
And a 1/2 cup of lemon juice (or however much your taste buds desire!). If you’re feeling real adventurous, throw in some zest too. I prefer lemon juice, but you could totally substitute orange juice. Be creative
Now for the cinnamon and honey. This step is completely optional and completely to taste. I really enjoy both cinnamon and honey, so I was a little generous with my shakes and tablespoons
Stir stir stir and set your heat to medium high
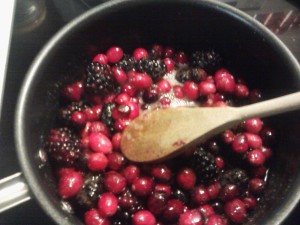
Watch it bet bubbly!
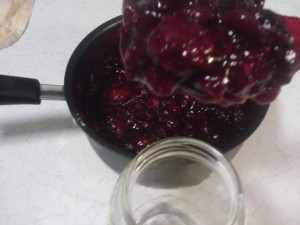
Did you know sitting a wooden spoon over your pot helps prevent it from boiling over? I wish I had known this years ago. It would’ve saved me a lot of clean up and certainly is a lifesaver nowadays. Stir occasionally as your sauce boils, about 10 minutes or so. You’ll hear the cranberries popping away.
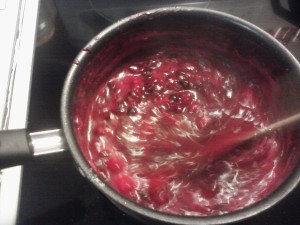
After 10 minutes of boiling and your berries are all popped, turn the heat down low to simmer. This is where you should taste taste taste to see if your sauce is too bitter, too sweet, not cinnamony enough. Adjust accordingly. This is YOUR sauce! Also, as your sauce simmers, it will thicken
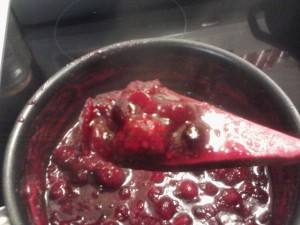
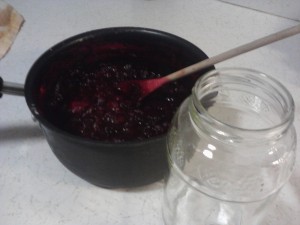
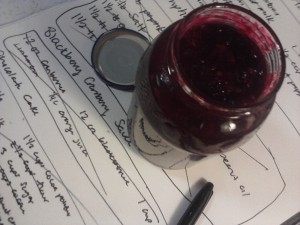
Of course, you can remove your sauce from the heat if you want to skip the simmering bit. Either way, it will thicken. I just like to simmer for another 10 minutes because it makes me feel important and sophisticated. When you have enough sophistication in your life, turn off the heat. Once the sauce is cool, you can put it in a pretty mason jar!
Yum yum, if this doesn’t get you into the holiday spirit (whether it be Thanksgiving or Christmas), I don’t know what will
Be warned! This sauce may be a little too tart for your friends who insist on buying the sugary sweet store bought stuff in a can. That just means there’s more for you! But seriously, if you aren’t big on tartness just bump up the amount of sugar in the beginning. But I embrace the tartness! Ah, isn’t is just beautiful?
Happy (late) Thanksgiving and Merry Christmas! Now, where can I find some mistletoe…
Airports and airways

Let’s talk about Christmas cheer. As you can see, Toby is ready for Christmas. We’re only 10 days away folks…which of course means only 15 days until my birthday! I really can’t believe how quickly this year blew by. I remember how time seemed to move like molasses when I was a little girl. It took forever for Christmas and my birthday to roll around, which sucked anyway because they were only five days apart. As an adult, I thoroughly enjoy the fact that my birthday falls on the 30th, but come on- what kid wants to split presents like that? But now that I’m all grown up I feel like my years are getting shorter and shorter. Seriously, in 15 days I will be 24. Isn’t that a strange thought! It seems like yesterday I was 13 counting down the years before I could drive. I think the only age milestone I have left is being able to rent a car. So here’s to one more year of “adolescence” if you will.
Oh yeah, we were supposed to be talking about Christmas cheer and not silly things like turning 24. I love Christmas. Absolutely love love love it! I may be biased since I’m almost a Christmas baby and do love my birthday (if you haven’t figured that out yet!), but there’s something about wintertime and Christmas that just sends thrills down my spine. It’s just such a happy time. I used to be one of those bitter people that complained about hearing Christmas music all the time, but it’s really not that bad if you take the time to just slow down and enjoy it. I think that’s the problem with everything nowadays. Everyone is always running around to get somewhere. To do this, to do that. Rush rush rush. I myself fall victim to the hustle and bustle of life. Before you know it, Christmas is over, it’s the new year, and you missed all that music you were complaining about. I really do believe the reason time flies by so fast is because we never stop to appreciate the time we have. Our concept of time can be so rigid. Time is money, right?
That’s why I try my hardest to work on Indian time. Do you know what that is? Well, I’ll tell you! Indian time means that things will happen when they happen. You’ll arrive when you’re supposed to arrive. Etc, etc. A good example of this is when I hosted Thanksgiving. I told everyone to be hear at 2 but gave myself until 3 to have food on the table (though I think we actually ate at 2:30). Anyway, my point is that Indian time is just a more relaxed worldview I guess you could say and it’s so much less stressful than constantly worrying about deadlines and appointments and time in general. Things will happen when they happen and the way they’re supposed to happen. And that’s that!
So in celebration of Christmas spirit, holiday cheer, birthday extravaganzas, and not letting time pass us by…let’s enjoy a cup of eggnog. Mmm I love eggnog. It’s just so sweet from the sugar and cream yet spicy from the bourbon and rum. It’s quite pleasant really, though as with most things I didn’t discover this until recently. I’m sure my mother had something to do with that. I’d bet money as soon as she warned me of the evils of drinking raw eggs I was turned off of the stuff forever. Fortunately, I grew out of that picky stage and forever is a rather relative term.
This recipe is supposedly the one used by my sous chef’s grandmother (though it looks suspiciously like something i ran across on the Food Network). I tripled the ingredients to fill a large serving dispenser, but feel free to make less generous amounts.
And I promise to post my Thanksgiving entries soon. The goal is hopefully before Christmas. I told you time likes to get away from you! Oops…

Ingredients:
- 12 egg yolks
- 1 cup sugar, plus 3 tablespoons
- 3 pints whole milk (6 cups)
- 3 cups heavy cream
- 9 ounces spiced rum
- 4 ounces bourbon (1/2 cup)
- 12 egg whites
- Cinnamon
- Nutmeg
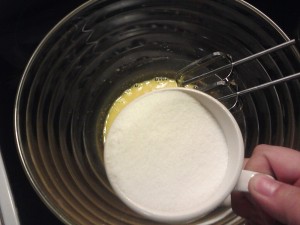
You could do this in a stand mixer if you have one handy. I don’t so we have to improvise a little bit. But that’s part of the fun! In the largest bowl you have, beat the egg yolks until they begin to lighten in color

Gradually add the cup of sugar
Slowly add in the milk, cream, and liquor. I just measured it all into a large pitcher and dumped it in

Sprinkle in some nutmeg and cinnamon. The recipe called for a tablespoon, but I like to go by taste. Stir to combine

Now for the egg whites! In another large bowl, though not your largest, beat the egg whites until they form stiff peaks. We’ve done this before with our waffles. Unless that’s one of the entries I haven’t posted yet. Either way, you just keep beating away until your egg white take more of a solid shape. In my opinion, they will end up looking like whipped cream

Add in the 3 tablespoons of sugar

Now listen carefully. Because we tripled the recipe and are beating together 12 egg whites…your arm might get a little tired even using an electric beater. Don’t give up. After so long you may begin to think your whites just aren’t going to fluff up. They will. Patience is a virtue when it comes to anything worth waiting for. See?

Of course, you can skip that whole step and omit the egg whites. But I like a little egg foam in my nog. Once all is said and done and your whites have turned into peaks, fold the “foam” into the milk and yolk mixture

There you go folks. Quick and easy homemade eggnog. Admire your work!

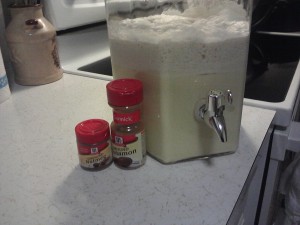
Serve in a lovely drink dispenser you received last year for Christmas. with some extra cinnamon and nutmeg for those that like things really spiced up. Actually, this stiff is kinda thick so I recommend serving it in a punch bowl with a lovely ladle
But make due with what you have

Yum. Now go sit back and listen to some darn tootin carols and let the scrooges mind themselves. Cheers!
Tijuana
Split the Big One

I’m supposed to be posting about the long hours I spent preparing Thanksgiving dinner last Sunday with my friends…but it seems the doughnuts I made tonight are taking precedent. I mean, hello! We’re talking about doughnuts here. As wonderful as my new cranberry sauce recipe is, I’m just way to excited about eating some fried dough to dwell on last week. Sure, these doughnuts aren’t 100% made from scratch. I admit the only reason these babies made it into existence is because I opened the fridge and saw a can of biscuits just begging to be made into something greater. But when you have a sudden doughnut craving, sometimes you have to bite the bullet and accept a little help from Pillsbury. I’ll make them from scratch next time…
Ingredients:
- 1 roll of biscuits
- 7-8 cups canola oil
Glaze
- 1 cup powdered sugar
- 1/2 teaspoon vanilla
- 2 tablespoons butter, melted
- 3 tablespoons milk (as needed for consistency)
- Pinch salt
Apologies (using the mighty voice of Spartacus), but I didn’t start taking photos until halfway through. It seems I’ve become so accustomed to my camera being out of commission I keep forgetting that it actually works now. Oh well. Heat the oil on medium high heat in a dutch oven or some sort of pot/pan with high sides. The oil should be over an inch deep and reach 350-375 degrees.
Meanwhile, pop that can of biscuits open and find something to start cutting holes in them with like a salad dressing bottle!
Now that your oil is nice and hot, carefully drop the doughnuts in 3-4 at a time. You don’t want to overcrowd them. My tongs were in the wash, so I used chopsticks. I really love how versatile chopsticks can be!


They cook really quickly, so flip them over after 30 seconds or so when they are golden brown. When both sides reach the desired color, carefully use your chopsticks to pull the doughnuts out and drain on some paper towels. Or some paper bags. Whatever you have handy!

Don’t forget to fry up the doughnut holes!

Once all your doughnuts are fried, you can start glazing them. Yum! Mix together the powdered sugar, vanilla, butter, salt, and milk until the glaze reaches a gooey consistency. It shouldn’t be too too thick, but it’s your glaze. You have artistic license to do as you will!


Once again, don’t forget the doughnut holes!

Aren’t they beautiful? All that’s missing is a tall glass of milk

Yes please. Thank you!

Enjoy!
Tijuana
Separation
I haven’t forgotten about you, I promise! Though, the way I’ve been updating lately y’all might have forgotten all about me. But things have been happenings, things that have taken up my time. For instance, with my current unemployed situation, I’ve been applying for jobs like crazy…and finally finally got an interview! Actually, it was more like a string of interviews over a month’s course for the same position. I’ll hopefully know by next week if I got it or not. I sure hope so! I need to buy a new camera so I can get back to sharing my tested recipes with everyone. It’s just so depressing without the photos, don’t you agree?
All that aside, I made my first cheese danish the other day. It was so much easier than I would’ve thought. Piece of cake (or rather danish haha). Since my camera is still out of service, I don’t have step-by-step pictures, but the boyfriend was kind enough to take a snapshot of the finished product when he got home from work. Since it was my first time working with a recipe like this, I didn’t make any tweaks so I’ll send you straight on to the original source here at Little House Living. It was delcious! And the dough was easy to make, which is saying something considering my track record with dough recipes

Browsing the web
I’m in love. Her name is Kay. She’s a Dutch girl and after a few days of browsing, I think her blog is amazing. It’s called Kayotic Kay and I can’t wait to make her Pink Peppercorn Hot Chocolate or Breakfast Pasta Bake. I’m all about some pasta bakes! I’ve already set up a link under my Foodies page, but here’s another link right here for your convenience.
Whoa, I really was in a linking mood, wasn’t I?
Sparkle

Today is a special day. Not my special day, no, but it might as well be as excited as I’ve been, counting down the days and suffering from fits of enthusiasm. But it is not my special day. Today belongs to the boyfriend. It’s his birthday! I love birthdays. I love everything about birthdays. I love the cake. I love the ice cream. I love the special dinner. I love the presents. Oh how I love the presents. I don’t think there is anything more fun than planning out a gift, of searching for just the right fit and then wrapping it up to give away. Of course, this year has been a little tight for my post graduate self, but that’s okay. It just means I’m going to have to have some kitchen adventures! I can pour just as much love into a dish as I can into a gift. Probably even more love. And it’s all for love, right?
I’m thinking Alfredo. Rich, decadent, creamy Alfredo. With bacon. And peas. And lemon. Delicious! If I asked the boyfriend what his favorite meal was, I’m pretty sure he would give me some noncommittal answer. I can’t blame him really. Even I have the hardest time with that question. But from several observations, I think Alfredo might be at the top of his list. I’d bet money on it. Plus, it’s just a great celebration dish in general. It’s not like you can eat this Alfredo everyday. No ma’am. We are going big. That means real cream. Of the heavy variety. And let’s not forget about the real butter. Did I mention the cheese?
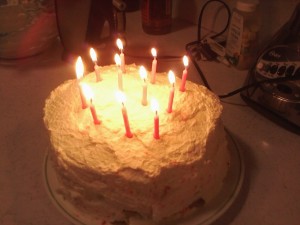
But that’s only half of it. We also need a special cake. Something homemade. I don’t even want to get into a discussion about those store bought concoctions. Bleh! I really wanted to make a German Chocolate cake. I was ready to take on the challenge. Then I discovered something called a sparkle cake. How could I pass on something with a name like that? Sparkle! Like the sparkling flames of birthday candles. Like the sparkling magic of celebrating your birthday. I just like the imagery that comes with a word like sparkle. So, my German chocolate recipe has been set aside for future use and we’re going to make a light, refreshing cake instead, which is probably more suited for a hot July day anyway
As much as I would love to fill this post with excruciating detail on how I prepared the cake, today I’d rather just show you the result and send you on over to the Pioneer Woman’s site. It was her recipe I used after all. But let me tell you a few things. I’ve never made an angel food cake before and I’m not sure I’m inclined to make one again. The batter was sticky and finicky and I didn’t even want to lick the bowl afterwards. But the cake was exactly what I was looking for and everyone enjoyed it.
Strawberry Sparkle Cake recipe courtesy Ree Drummond

The batter got really big. Whoa!

If you don’t have an angel food cake pan, a bundt pan will have to do. Ungreased.

I really thought it was going to overflow all over my oven

I tried the best I could to dig the cake out of the pan. I heard a rubber spatula works wonders

I resorted to a butter knife

The filling was my favorite part. Strawberry jello with whole strawberries!

Whipped cream smeared all over = heaven

The cake was a bugger success than I hoped. Woo hoo! But dinner…dinner was a great hit! In fact, it was such a great hit I’m going to give the Alfredo it’s own post. Stay tuned!
Sanguistas

For the past couple days, a friend and I have been exchanging emails in search of the perfect chocolate frosting. She’s gone and made a birthday cake for one of her friends and the request was simple: chocolatechocolatechocolate! Of course, I’m not the biggest chocolate fan, but I understood her needs. We wanted a real recipe, something worth presenting for a birthday! Not one of those wimpy recipes claiming to be the best only to be the most flavorless thing you’ve ever tasted. No ma’am! My first thoughts were maybe something along the lines of a ganache, but considering the size of her cake, well, that would require a lot of frosting and a bit of money. So now there’s naught to do but choose a nice fudgy frosting. I’m sure it’ll work out fine and the chocolate lover will be most happy with the results, which will have consisted of international efforts!
All this talk of frosting has put me in the mood to bake a cake. I’ve never been much of a sweets person, but here lately I seem to be craving them all the time. Maybe craving is an exaggeration, but I usually get around to making something sweet once a week when once upon a time I made something maybe once a year (ahem my own birthday cake, which is quite divine!). I blame all the boys. In this house, we usually have some sort of weekend gathering, typically involving a bonfire surrounded by a lot of menfolk. One day, I decided to make them cookies. Then I made them brownies. Then I made- well, you get the picture. Anyway, I’ve created some sort of monster. They want sweets…and I want to make them! There’s just no controlling this new found urge. Sometimes it’s best just to give in.
Anyway, I went to a little dinner get together last night with my friends and I decided on a whim to provide dessert. For probably the past month I’ve been making a lot of chocolate things (huh?) and was itching for a change. That’s when I stumbled across a bag of pistachios in the cabinet.
Mmm pistachios! I am a recent lover of pistachios. A few years ago a friend’s grandmother made us watergate salad (oh yum!) and I was intrigued. A year later I tried some pistachio ice cream in Costa Rica and I was hooked. Finally, I had a little taste of the tiny green nut itself in a grocery store and I knew there was no going back. What a marvelous little fellow. Great snack! So addicting. Before you know it, the whole bag is gone…be warned!
I do, however, have a confession to make. I cheated. I did not make my cake from scratch. I bought a box and dumped the contents into a bowl then added a few extra tid bits. The cake was good, don’t get me wrong. It was gone by this morning. But in my opinion it was a little on the sweet side so next time I am most definitely doing it start to finish myself so I can make adjustments. But the recipe is a keeper so I thought I’d share as is. It’s a nice summer treat!

Ingredients:
The Cake
- 1 yellow cake mix
- 3 eggs
- 1/2 cup vegetable oil
- 1 tbs honey
- 2 tsp orange extract
- 1 package pistachio instant pudding
- 1 cup water (or lemon-lime soda)
The Honey Frosting
- 1 stick butter, softened
- 1 cup powdered sugar
- 1 cup granulated sugar
- 2 tsp vanilla
- 1 tbs lime/lemon juice
- 2 tbs honey
- Pinch of salt
- Splash of milk
Talk about easy! Take all your cake ingredients and put them in a bowl

Find your mixer and put it to work!

If you want, add some green food coloring (I didn’t have any)

Goodness gracious, this is going to take less then 5 minutes! Take a pan of your choosing and batter up (hehehe get it? Eh, maybe not). I chose to make a bundt cake, but I’d bet money these would make great cupcakes! Always a crowd pleaser


Gah! Go preheat your oven to 350 degrees. Once day you’ll remember to do this ahead of time. Hmph! Now for the frosting, which we are going to do ahead of time so as to let it set up a bit in the fridge. Cream together softened butter and honey. I may have been generous with my honey

Slowly mix in sugar and milk. Now, some people don’t like to find “odd” textures in their food. For the most part, I am not one of those people. That’s why I added both powdered and granulated sugar to my icing. But if you doubt me (and someone did just before they ate two slices), skip the granulated sugar and double the powdered sugar to two cups. No problema

Finally, mix in the rest of the ingredients. I love the tang that cream cheese brings to an icing. Since I didn’t have any cream cheese, I used citrus juice to create a similar flavor. It’s a nice, unexpected surprise. When your all done, put the icing in the fridge. Do you say icing or frosting? Is there actually a difference…

The cake is done. Let it sit for about 5 minutes before flipping it. If you remembered to grease your pan, this will be a cinch!

Ta-da! It’s like magic. What a beauty! Just admire that golden color

If you’re nervous your friends won’t like your new frosting experiment, serve it on the side. Ooh, how fancy!

To make it fancier, sprinkle chopped pistachios on top

To make it even more fancy, spread the nuts in shell around your cake like a professional! It’s all in the details. Guess they liked it

Hope you do, too! Next time, I”m going to try two packages of pistachio pudding. Just to see how it affects the flavor.
Tijuana
Of hearts and stomachs

The other day I decided I wanted to open up a bakery. Of course, this is not the first time I got such a whim up my butt and it certainly will not be the last time. I constantly waver between pursuing a career in food or a career in academia (along with careers in writing or nutrition or agriculture). This idea of a bakery was triggered by two things. The first is a book I’m currently reading, The Baker’s Apprentice by Judith Ryan Hendricks. I find it very easy to get caught up in a character’s life, to escape into fiction for a couple hours. Before you know it, I’m romanticizing driving to work late in the night, setting a playlist on my iPod long after most people have gone to bed, and digging my fingers into flour until the wee hours of the morning. I suppose the book spurred on my early morning decision to type become a baker into my search bar. That’s how I discovered bloombakeshop.com, with its quaint and simple design. After reading the owner’s story of how she left the pharmaceutical world for a world of dough and entrepreneurship, I immediately wanted to jump on the band wagon. I’m pretty sure the tantalizing pictures of whoopie pies under her menu page helped with this sudden inspiration.
With origins in the Amish/German communities of the American north east, whoopie pies are traditionally made with a chocolate cookie cake and vanilla cream filling. We all know how I feel about chocolate, so I wanted to make a pumpkin whoopie pie with a -get this- lemon cream filling. It may sound like a strange combination to some (cough cough), but you’d be surprised what flavors can fuse together. Like Chinese and Mexican. Don’t knock it!

Unfortunately, the only store within walking distance (got to get my exercise somehow!) did not carry pumpkin puree, so I had to change my game plan. On my way home, walking up and down the streets for a little added cardio, a recipe began to form in my head. Why not make a tiramisu whoopie pie? With a hint of lemon! That way there’s coffee, there’s chocolate, there’s lemon, and there’s vanilla. Everyone is happy!
So I set about doing a little research, comparing recipes I found online and in cookbooks, and eventually came up with a pretty satisfactory recipe of my own. You know, as a child I wasn’t really much of a whoopie pie sort of person. It goes back to the not caring a lot for chocolate thing. But now as an adult inclined to spend a good chunk of my time in the kitchen, I have the freedom to experiment and these little babies have been calling my name going on a week now. Fortunately, it only takes one to satisfy the craving. Otherwise I’d probably be the size of a hippo! Remember, the great thing about baking is sharing! Send your goods over to a neighbor. Maybe you even have a cute, single neighbor. You find the heart through the stomach folks! Now, my whoopies are more cakey and less cookie-like. Just so you know.

Psst…feel free to ignore my chicken scratch. We do not live in an era of penmanship. My grandmother is quite ashamed
Ingredients:
Batter
- 1 stick butter, softened
- 1 cup brown sugar
- 1 egg
- 1 tsp vanilla
- 2 cups flour
- 1/4 cup cocoa powder
- 1/4 cup instant espresso
- 1 1/4 tsp baking soda
- 1 tsp salt
- 1 cup butter milk
Orange Creme
- 3 cups powdered sugar
- 8 oz cream cheese or mascarpone, softened
- 4 tbs butter, softened too
- 1/2 tsp vanilla
- 1/2 tsp orange extract
- 1 tsp rum/Marsala (optional)
Quick tip! If you don’t have buttermilk on hand (which, who does?), it’s super easy to make. Put a tbs of lemon juice or vinegar into you measuring cup. Fill the rest with your milk. Let stand for about 5 minutes. Your milk will begin to look chunky- don’t panic!
Preheat over to 350 degrees. I always forget to do this step first. It really does save time to remember. We’re going to make the batter first. In a large bowl, cream together your butter and sugar

Once that’s done, crack in your egg and add the vanilla. Mmm I still have some homemade vanilla leftover from someone’s Nana…but I’m running low!

It won’t kill any of us to take a little taste. We’re lookin’ for a nice creamy consistency. Hey! It kinda looks like peanut butter. Eh, or smooth almond butter

In a separate bowl, combine all the dry ingredients. Mix mix mix!


By now, your milk will be nice and curdled. Not being a professional, I don’t know if that’s really what happened between our milk and lemon juice. I’m just guessing. Definitely looks more like a divorce than a marriage, though! In an alternating fashion, pour milk and flour mixture into the batter
 Look at the chunks!
Time for more tasting! I won’t tell if you don’t… Dollop batter onto a greased (or nonstick) cookie sheet with an ice cream scoop. Mine isn’t the clickedy kind. That would be most helpful in my kitchen


Bake your dollops for 10-12 minutes. Repeat until all your batter has disappeared! Let cookies/cakes/whateveryouwannacallthem cool on counter

In the meantime, we can make the orange cream filling! Originally, I was going to make a plain and simple vanilla filling. Then I got the urge to add some lemon. Addict, remember? But then I discovered some orange extract chillin’ in my spice cabinet and decided what the heck! So, take your softened cheese and butter and give them a nice little whirl with your mixer/beater in a bowl

Go ahead and add the vanilla and orange. If you have orange zest, that would be fantastic! At this point, you can go ahead and mix in your rum. All I had on hand was whiskey and wine, neither of which I felt would make a good contribution to my orange cream. No alcohol for us today. Finally, mix in your powdered sugar. Do this a little at a time if you don’t want it to suddenly cloud up into the air and get all over you

Oh boy! I think that was my favorite part. Of course, another taste test is in order. We got this under control. No bad flavors are going to sneak into this kitchen! Put the filling into the fridge for a spell to help give it some extra body
Almost done! Now that the cookies are cool and the creme is stiff, time to assemble. We’re going to make use of our Ziplocs again. Make a piping bag and swirl the filling onto half of the cookies

Then top it off with the rest of the cookies. Ahhh! We now have a nice little cake sandwich aka a whoopie pie (black moon, gob, big fat oreo, etc)

Enjoy! And don’t be afraid to experiment with different flavors. I’m dying to make one with a mint creme! Or perhaps a vanilla cookie with a berry creme for summer. Possibilities. They never get old.
Tijuana
If you could only see the beast you made of me
Those are the opening lines to a song I’m listening to right now. If you’ve never heard of Florence + The Machine, I highly recommend that you check ’em out. A friend of mine introduced me to this indie band a couple years ago and ever since I have kept their songs close at ear on my iPod. Aside from enjoying the music itself, I find the lyrics to be very powerful. Howl is one of my favorite songs because the lyrics seem so primeval to me. When I listen to it, I feel like I’m hearing an ancient story, a tale of ritual and sacrifice, of longing, lust, and betrayal. Maybe that’s not what they were aiming for. I’m a folklore enthusiast so perhaps my interpretation is a little off, but hey- that’s the beauty of art in all it’s forms.
If you could only see the beast you made of me. Beastly. I feel like that at times. In fact, just last week I was quite disagreeable. I was grumpy, irritable, and down right unpleasant. I blame the moon. She hung plump in the night sky, full as a belly, and wooed me into a state of irrationality. Fortunately, the moon has waned and I’ve returned to my usual amiable self. Thanks to last night’s date-dinner, I’m in a rather loving mood. Do you know what goes well with that sort of mood? Chocolate (said in a throaty acento venezolano)
As a show of my appreciation for that oh-so-yummy lasagna, when I got up this morning I decided to try and make Candice Kumai’s Pretty Delicious Peanut Butter Cups. When I say pretty delicious, I do mean delicioso. For once, I did not alter the recipe, though I have some pretty groovy ideas for next time. Like using dark chocolate. Truth be told, I’ve never been much into chocolate. I always chose vanilla from those giant Neapolitan tubs of ice cream my great grandma kept in her freezer. But I do recognize the lovely qualities that chocolate possesses and every girl needs a chunk of darkness every once in awhile. So, next time I will use deep dark decadent chocolate instead. I might even test out crunchy peanut butter. But in the meantime, recipe courtesy Candice Kumai.

Ingredients:
- Chocolate chips
- Peanut butter
- Rice crispy cereal
- Butter
- powdered sugar
Easy peasy!
Melt chocolate in a double boiler, about 12 ounces. You could do this in the microwave I suppose, but that takes the fun out of using a double boiler. As you can see, mine is very fancy. Seriously, all you need is a pot of boiling water and a bowl that fits on top

Before you know it your chocolate chips will go from this:

To this. So silky and smooth!

Now the fun, messy part. Paint your cupcake tins! I bought mini ones. Some things are better in miniature

I forgot I had smaller paint brushes and tried painting the tins with a considerably large silicone brush. Eventually, I gave up and used a spoon instead. Whatever gets the job done! Am I right or am I right?


Once you have all your tins painted, line them in a muffin pan and go stick them in the fridge for 10 minutes. This is a good time to have a slice of leftover lasagna before you make the filling. Yum. Oh yeah, and there will be leftover chocolate. We need that for later!
Okay, now for the filling. Take your peanut butter (I used almost 1 1/2 cups) and your butter (1 tbs) and put it in a pot over medium heat. Let cook down, stirring, until nice and sleek.

Add rice cereal (about 1 cup) and powdered sugar (1/4-1/3 cup). Mix it all up! Remove from heat

You chocolate painted cupcake tins should be ready by this point. Take them out of the fridge and spoon filling into each cup, about a teaspoon or so (I think I put some emphasis on the so part). You can always go back and add more once all your cups have some of the filling in them

Finally, we are going to take all that leftover chocolate and pipe it over the filling. I don’t have any pipping bags, so I just use ziplocs. Very easy to do

My piping isn’t all that pretty…but I was running out of chocolate! I had to make it last. Good thing I didn’t snack on those chips before I melted them down

All done! Put your finished product back in the fridge for about 30 minutes and serve. These would make a lovely gift for someone I’m sure. Or just a perfect treat for yourself. In my case, it’s a very big thank you!

Très mignon!
Tijuana
