Almost like my mama

What do you know? I’m back again already! That’s because I cook in phases. This has been a very good weekend for cooking. Unfortunately, I don’t have detailed pictures for this recipe, but that’s okay. I’ll probably revisit this again in the future.
Once I boasted that I my diet consists largely of chicken dishes and Italian food. With an Italian father who also happens to be a chef, that’s what we ate. That’s what I love. That’s some of my favorite comfort food. But Italian is not the only thing in the blood. I come from a Southern family. Fried chicken, cornbread, barbecue, and (my absolute favorite!) fried cauliflower are also classic comfort foods in my kitchen, especially if you serve it all with a heaping bowl of mac n cheese. However, with the holidays approaching and the weather crisping up, I’ve been feeling awfully Polish of late. That’s right. I got some of that going on as well.
When I was dating the sous chef, I was pleasantly surprised to learn that his family serves pierogies with their holiday meals. And they are so good! Pierogies and kielbasa. I really hope to feast on them again this year, too. My family eats Gołąbki. For those of you that aren’t familiar with the term, golabki is also referred to as cabbage rolls or stuffed cabbage. Now this wasn’t a holiday meal for us as more of a I’m-in-a-golabki-mood kind of meal. I remember the first time my mom made it. I was not excited about the idea of having stuffed cabbage for dinner. Keep in mind I was a picky child. Thank goodness I grew out of that! But let me tell you, one bite and I was hooked. Tender cabbage, seasoned meat, homemade tomato sauce if you have the time and produce (my mama always bought it in a jar, but I’m a scratch kinda girl). Delicious!
This time I did not make my own tomato sauce, and this is not my mama’s recipe. I’ve made modifications of my own that seem to have worked out better than I expected.
Ingredients:
- 1 head of cabbage
- 1 onion
- 1 green bell pepper
- 1 lb ground beef
- Garlic
- Olive oil
- 1 cup or so of prepared quinoa (rice is used traditionally; be my guest)
- 1 egg
- Salt, pepper, and parsley
- 3/4 cabbage water
- 1/4 cup + another 1/2 cup tomato sauce plus more for serving
The first thing you need to do is set a large pot of water to boiling for your cabbage. While you wait for that to happen, remove the core of the cabbage. This has never been my forte, in fact I’ll admit that I sent the core shooting across the kitchen and knocked a glass off the counter. If you don’t know how to core a cabbage, I recommend YouTube. We are boiling/blanching our cabbage whole, so don’t go butchering the poor thing. I’m pretty sure my mom did not boil it whole but removed the leaves to boil. Don’t ask how she managed that. In my opinion, you get less tears if you boil the thing whole. Less work, too.
Once you’ve cored the cabbage and your water begins to boil, place the cabbage in the pot core side down and cover with a lid. If your pot isn’t large enough to really submerge the whole head, you can flip it over halfway through. Don’t forget to salt your water.
Meanwhile, shop your onion and bell pepper, and mince the garlic. Get out a saute pan and set it on medium, drizzle it with some oil, and let your veggies sizzle. Cook them down for about ten minutes until tender. Make sure to salt and pepper them to your liking. When they are done, set aside in a mixing bowl.
Check your cabbage. At this point it might be ready. Sometimes you just have to start removing some of the outer leaves and put the heart of the cabbage back to boil. I prefer doing this on a cookie sheet for easy clean up. Using one fork, spear your cabbage core. Use another fork to peel back as many of the tender outer leaves as you can and set them aside. Maybe you’ll gt lucky and the whole thing is tender, but I doubt it. Place the rest of the cabbage back into the pot and continue boiling.
Now, I really wish i had a picture for this part. If you’ve worked with cabbage before, you know that each leaf has a little rib in it. This makes for difficult rolling. Take a paring knife and peel off the thickest portion of the rib. You don’t want to cut all the way through the leaf. Just remove as much as the rib as you can while leaving your cabbage leaf in one piece. It’s not as hard as it sounds, though your cabbage may still be rather warm so don’t burn yourself with hot water that may be collected in the leaves. Once the cabbage is all set, we can work on the filling.
As I mentioned, traditionally rice is used for the filling. I decided to give quinoa a try because I’ve never really had it before and was told it’s a lovely rice substitute. The verdict is still out, but it still left me with a great dish. If you don’t want to use quinoa, stick with rice. White rice, brown rice, it’s up to you. I used to save those little cartons of rice that came with my Chinese food. Works great!
Anyway, take your mixing bowl with the onion mixture and add the meat, the egg, the quinoa, 1/2 cup of tomato sauce, and salt, pepper, and parsley to taste. Mix it all up with your hands. Really get in there! That’s it! Preheat your oven to 350 degrees and start rolling.
You may think the idea of assembling your cabbage rolls is hard work, but it’s not. I’ve been doing it since I was 11. You can too. Of course, there aren’t precise measurements here. You have to go a little on instinct. If you’re nervous about running out of filling, you can count up your leaves then roughly divide your filling within the bowl. I just separate it into quarters and go from there. If you run out of filling, that’s okay because we want to save a few of the cabbage leaves anyway for baking.
To roll your cabbage, take a leaf and place it in front of you so that it looks like a little cup. The thickest part of the rib should be facing you. Take a spoonful of filling and plop it onto the end of the leaf where that thick rib used to be. Roll the leaf over the filling once, keeping it tight. Once you get over that first roll, fold the sides in then continue rolling. Someone once told me it was similar to rolling an eggroll. I’ve never rolled an eggroll so I’ll have to take their word on that. If you don’t get how to do it, YouTube is your friend. There are plenty of videos on how to make golabki. Some of them are in Polish, but that doesn’t matter. Just watch the technique. I promise it’s easy. Of course, the bigger your leaf, the more filling you’re going to use. The smaller the leaf, the less filling. Just feel it out!
Line a baking dish with your rolls. Some people cook their golabki on the stove. I prefer baking. I only got 11 out of my cabbage, but I’ve been known to get as many as 16. It depends on the head. It’s only me, so I didn’t want to make all that many. However, these taste even better the next day so they make great leftovers. Yum!
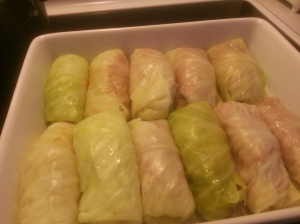
Once you have all your rolls lined in the dish, take about 3/4 cup of your cabbage water and mix it with about 1/4 of a cup of your tomato sauce. My mom just doused the whole thing in tomato sauce. You can do that if you like. Next, cover the rolls with a few of the leftover cabbage leaves. Now cover the whole thing with foil and stick it in the oven.
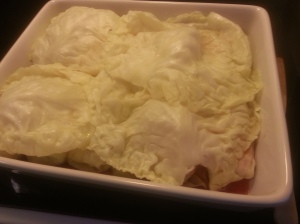
Bake for an hour and 15 minutes. Then turn off the oven and leave it in for another 15 minutes. You basically just steamed your rolls, so wait a bit before you remove the foil and cabbage rolls, anywhere between another 15 minutes up to half an hour.

My preferred way of serving is with more tomato sauce. So heat some up and spread over your rolls. Maybe you have some pierogies on hand to serve with them as well.

Once upon a time

So I know a while ago I said I was back after realizing I could upload posts from my phone. If you haven’t already figured it out, I was not a fan of phone-blogging. Took too much time. But now I have my crappy laptop back for the time being so I might as well cook up a storm while it lasts. Don’t get too excited, though. I’m moving. Again. Because that’s what I do. So once again, I’ll try to cook more often while I can, but things won’t really pick up again until I get into my new place. Hopefully this one will last a little longer.
Anyway, for those of you that don’t know me too well, I am not a fan of pot roast. See, I’ve always been a chicken girl. Then I became a sometimes pork girl. Never have I considered myself a beef girl, though I do enjoy a well made steak. However, the other day I really wanted to sink my teeth into some meat. And when I think meat, I think cow. Chuck it up to the gloomy days we’ve been having, but I decided pot roast was going to be on the menu.
Only, I’d never made a pot roast before. Thanks to Google and several blogs, I came up with a semblance of a recipe to work with. It’s not perfect, and I’m sure once I really develop a taste for pot roast I’ll come up with something better, but it wasn’t as bad as I’ve always imagined. I’d really like to know when I developed such a negative idea about pot roast…
Since this was my first attempt, measurements weren’t really exact. I kinda just threw things into the pot!

Ingredients:
- 3 lb boneless chuck roast
- Salt and pepper
- Olive oil
- Carrots, chopped
- Celery, chopped
- Onion, chopped
- Garlic, minced
- 1 15oz can diced tomatoes
- Red wine
When I started my research, I noticed a trend. People like to sear their meat first. I’m not saying this is a necessary step. Please keep in mind I’m still not quite a pot roast enthusiast yet, but it seemed like a pretty good idea. So I pulled out my big pot, turned the heat on high, drizzled it with a bot of oil, and dropped my chuck in. Careful not to let it splatter. Don’t forget to salt and pepper it first. Liberally.

Notice the fat. I’m told fat is good for pot roast. Adds mm mm flavor. Make sure to sear all the sides until nice and golden. But we aren’t cooking the meat all the way. That’s not what searing means. We just want to brown the outside. Place on a plate when it’s ready and turn the heat down to medium. Hopefully your kitchen didn’t become as smokey as mine when you seared your roast. Bad ventilation…?

Now the aromatics! Add a splash more olive oil to the pot then take all those chopped veggies (plus the minced garlic) and toss them in. Oh, just smell it!

Cook them down for five minutes or so. Add the seared chuck back to the pot.

Tomato time! Pop the lid and pour them in.

Ah, next the wine. Red wine. Any red wine you like. I decided to try this one, but pick your favorite!

I’d go with about two cups. Or more. Just save yourself a glass. also, add some greenery. Rosemary and thyme please.

Bring to a boil then turn the heat way low. Cover and simmer. And simmer. And simmer. In fact, just forget about it for a good long time. Five hours, eight hours, overnight. Pretend it doesn’t exist. Only, that’s going to be pretty hard. I may not be a pot roast girl, but it sure does smell good. Does it get any better than this? I recommend leaving the house for a while. The temptation is too great!!!
After that good long while, you can check on your roast. Some people turn the heat back up at this point for another 30 minutes, flipping halfway through. I decided to give it a try. I’m not really sure this was a good idea uncovered, but went with it anyway.

All done! Plate ‘er up! I served mine with mashed taters. That recipe will come along eventually.

Not bad for my first time, but I didn’t cook mine as long as I would have liked. So make sure to forget about yours!
